One of my favorite things about teaching sensation and perception is showing students that you don’t need a stage or sleight of hand to create a little magic. Our senses and brains can make us question what we see—and in psychology class, we get to look behind the curtain and figure out why.
In this post, I’m sharing a few of my favorite demonstrations, from a vanishing “x” and a floating finger sausage to turning the classroom upside down. Whether you’re new to teaching psychology or a seasoned pro, I hope you find something a little “magical” to try with your students!
Blindspot
Finding the blind spot is a psychology classic. If you haven’t tried this demonstration before, here’s a brief explanation. I tell students they’re going to make a symbol “magically” disappear from their vision. Then I give them these instructions: Take out the piece of paper with a dot and an “x” on it.
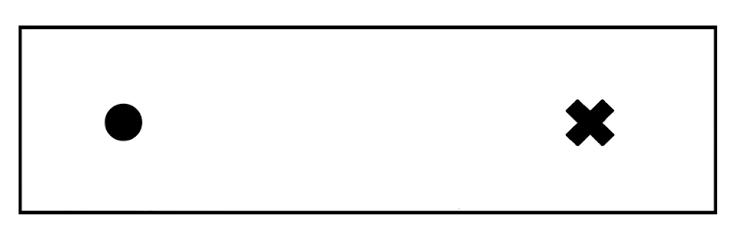
Hold the paper so the dot is on the left and the “x” is on the right. Cover your left eye and focus on the dot. Slowly move the paper toward your face. At a certain distance, the “x” will disappear.
At this point, some students think I’m David Copperfield. In reality, I am teaching them about their blind spot. The blind spot is the place on the retina where the optic nerve exits the eye. Because there are no light receptors there, the eye can’t detect an image that falls on that spot. Most students don’t see a blank patch, though, because the brain fills in the missing area using the surrounding visual information. Just like magic!
Retinal Disparity
The finger-sausage illusion is another quick demonstration that makes students wonder if their eyes are playing tricks on them. I tell them they’re going to make a little floating finger appear between their hands. To try it, hold both index fingers at eye level, about five inches in front of your face. Point your fingertips toward each other, about half an inch apart. Keep both eyes open and look at something in the distance behind your fingers. If you keep your eyes focused on the background, a little “sausage” may appear to float between your fingertips.
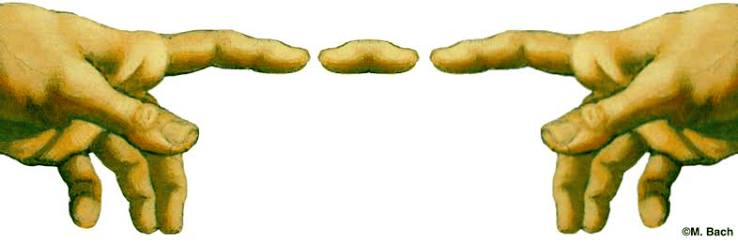
This happens because each eye sees the nearby fingers from a slightly different angle. The brain compares those slightly different images to help judge depth—and presto chango: a floating finger sausage! It’s a fun way to introduce retinal disparity and show how the brain uses information from both eyes to create our perception of depth.
Perceptual Adaptation + Retinal Inversion
If you haven’t played The Upside Down Challenge with your students, run—don’t walk—to the nearest store. It is that good. Students take turns wearing the game’s goggles and trying challenges such as connecting dots, drawing a shape, or giving a partner a high-five.
In groups of three, students rotate roles: goggle wearer, challenge reader, and observer. Once everyone has had a turn, discuss: What felt difficult? How did students adjust their movements? What does this suggest about how the brain uses visual information to guide action?
The game illustrates perceptual adaptation—how the brain adjusts to altered visual information and learns to guide movement using it. It also offers a chance to review retinal image inversion, the process by which the cornea and lens focus an upside-down image of the visual scene onto the retina.
One important caution: Don’t let students walk unassisted while wearing the goggles. I have them stay seated.
Rods and Cones
In this lesson, students investigate what they can—and can’t—see in their peripheral vision. One student keeps their gaze fixed on a dot straight ahead while slowly moving a card with a colored shape and printed word from the side toward the center of their vision. As the card moves, they report when they first notice movement, identify the color and shape, and can finally read the word. Their partner records how close to the center each detail becomes clear, then they switch roles. Students are often surprised by how much closer the card needs to be before its details come into focus.
The activity lets students experience the difference between peripheral and central vision firsthand. As the card moves toward the center, its details become easier to identify. The fovea is a small area at the center of the retina where vision is sharpest. It has a high concentration of cones, which help us see color and fine detail. Rods are more common outside the fovea and help us see in dim light. Peripheral vision is especially sensitive to movement. (Shout out to Maria Vita and the APA TOPSS team for this lesson!)
The Big Reveal: Your Brain Behind the Magic
These are four of my favorite vision demonstrations. I weave them throughout the unit, but they also work well as stations. From a vanishing “x” and floating finger to upside-down goggles and the limits of peripheral vision, each lets students experience an illusion firsthand, then peek behind the curtain to explore how the brain shapes what we see.
I’d love to hear about your favorite demonstrations and activities. Please share them below.
Be Well,
Cori


Leave a Reply